Home
» Knowledge
»
A Complete Guide to Bridging Crypto Assets Across Different Blockchains
A Complete Guide to Bridging Crypto Assets Across Different Blockchains
Moving crypto from one blockchain to another is not the same as sending a token to another wallet address. Blockchains operate as separate systems, so a bridge must coordinate a transfer between the source network and the destination network. Depending on the bridge design, that can involve locking an asset and minting a corresponding representation, burning and minting, or using liquidity on both sides. Ethereum's developer documentation describes these as common cross-chain transfer patterns and also emphasizes that every design involves trade-offs.
This guide uses one clearly labeled hypothetical example throughout: suppose Maya has 0.12 ETH on Ethereum Mainnet and wants 0.05 ETH available on Arbitrum to use an application there. Maya is fictional, and the balances, screens, fees, and transaction details shown below are illustrative. They are not a real transaction, test result, endorsement, or promise of what any bridge will display.
A cross-chain bridge is infrastructure that enables assets or information to move between otherwise separate blockchain environments. The phrase “move an asset” is convenient, but it can hide what happens technically. A token is not simply picked up from one ledger and placed on another. Instead, the bridge uses a mechanism that preserves economic equivalence across networks.
Common designs include lock and mint, where an asset is locked on the source chain and a corresponding token is issued on the destination chain; burn and mint, where supply is destroyed on one side and created on the other; and liquidity-based transfers, where liquidity providers or relayers make assets available on the destination side while the protocol settles between chains. The exact mechanism matters because it affects trust assumptions, finality, fees, and what token you actually receive.
That also explains an important mistake to avoid: the same hexadecimal wallet address appearing on Ethereum and another EVM-compatible network does not merge the two chains. A normal send on the wrong network may leave assets on that network rather than placing them on the chain you intended. MetaMask's bridge guidance explicitly warns that separate networks do not automatically know about each other's balances.
Bridge types: native, liquidity, and generalized cross-chain systems
Bridge approach
What it generally does
Main trade-off to inspect
Native or canonical bridge
Connects a blockchain or rollup to its designated parent or settlement chain using the ecosystem's own bridging contracts.
Often minimizes extra trust assumptions, but withdrawal or finalization rules may be slower in some directions.
Liquidity bridge
Uses pooled liquidity, relayers, or market makers so users can receive assets on the destination network without waiting for the canonical settlement path.
May improve speed or convenience, but introduces provider, liquidity, pricing, or additional smart-contract assumptions.
Generalized message bridge
Transfers messages or arbitrary data as well as tokens between networks.
Capability is broader, so users and developers should understand the verification and security model rather than judging only by speed.
There is no universal “best” bridge. Ethereum's documentation recommends evaluating security, convenience, connectivity, cost, and the ability to pass complex data. For a user like Maya, the practical question is narrower: which supported route delivers the intended asset to Arbitrum with acceptable fees and trust assumptions?
Before you bridge: a short safety checklist
Confirm the exact source network, destination network, token, and amount.
Open the bridge from an official project site or verified documentation rather than an unsolicited message, ad, or copied link.
Check whether the token is supported on both networks and what asset will arrive on the destination chain.
Keep enough of the source chain's native asset to pay transaction gas. If you plan to transact after arrival, also make sure you can pay gas on the destination chain.
Compare the live quote, bridge fee, network fee, expected amount received, and any minimum or maximum transfer limits.
For a valuable transfer or an unfamiliar route, consider a small test amount first. MetaMask's official token-address guidance also recommends test transactions before larger transfers.
Eight practical steps for bridging assets
1. Check your wallet, network, and available gas
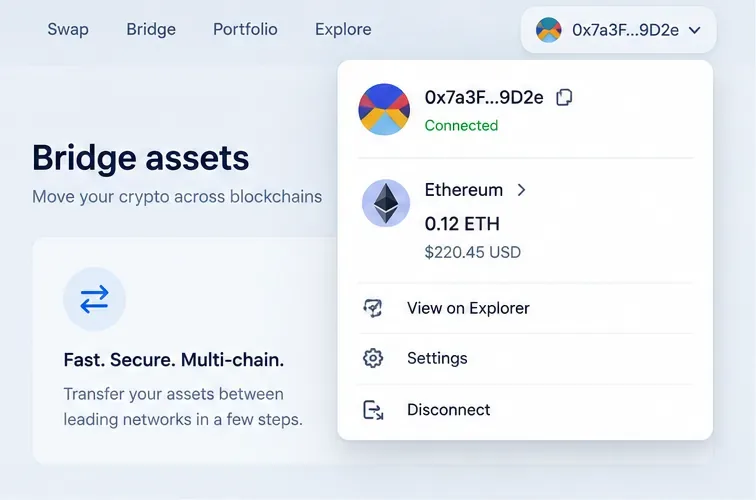
Maya starts by confirming that her wallet is connected to the account holding ETH on Ethereum Mainnet. She checks that the displayed network is Ethereum and that she has enough ETH for both the 0.05 ETH transfer and the source-network gas charge. If Maya were bridging an ERC-20 token instead of native ETH, she would still need the source chain's native gas token to approve and send the transaction.
Step 1: Confirm the connected account, source network, balance, and enough native gas before opening a bridge.
2. Choose the bridge route by security model and live quote
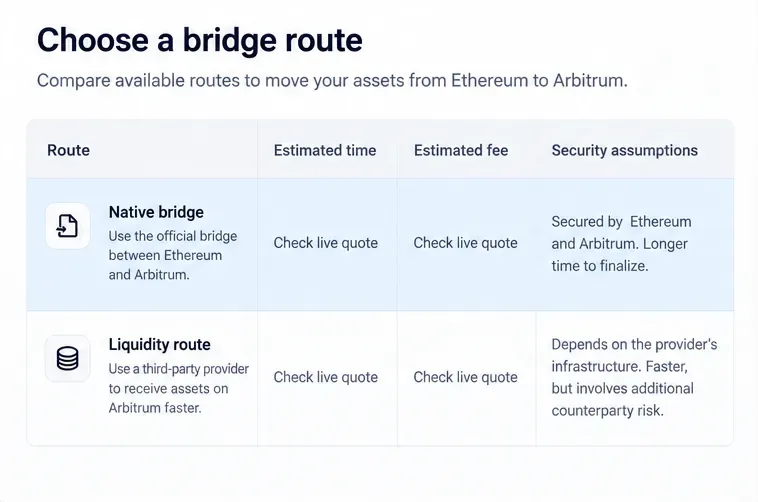
Next, Maya compares a native bridge route with any reputable liquidity-based alternatives that support Ethereum to Arbitrum. She does not choose solely by the fastest headline. She checks who or what verifies the transfer, whether additional contracts or relayers are involved, the live fee estimate, what asset will be delivered, and what happens if the route is delayed.
For Ethereum and Arbitrum specifically, the official Arbitrum documentation provides a bridge section for moving ETH and ERC-20 tokens between Ethereum and Arbitrum chains. Third-party bridges can be useful, but they add their own design and operational assumptions.
Step 2: Compare route security assumptions and current quotes instead of relying on a fixed fee or transfer-time estimate.
3. Set the source chain, destination chain, asset, and amount
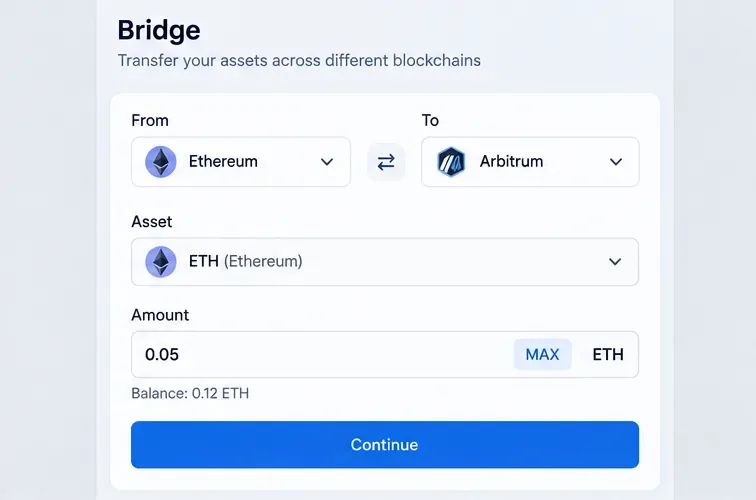
Maya selects Ethereum as the source, Arbitrum as the destination, ETH as the asset, and 0.05 ETH as the illustrative amount. This is the point where a simple reversal matters: bridging Arbitrum to Ethereum can follow different timing and settlement rules from bridging Ethereum to Arbitrum. The direction shown in the interface must match the direction you actually want.
Step 3: Set the source and destination networks deliberately, then enter the asset and amount you intend to bridge.
4. Verify the destination asset, not just its ticker symbol
A ticker such as USDC, ETH, or USDT is not enough to establish token identity across chains. Wrapped, bridged, native, and third-party versions can share similar names. For ERC-20 tokens, verify the contract address from the token issuer, bridge documentation, or a trusted block explorer reached from an official source. MetaMask's official token contract address guide explains why the contract address identifies the token and how to find it.
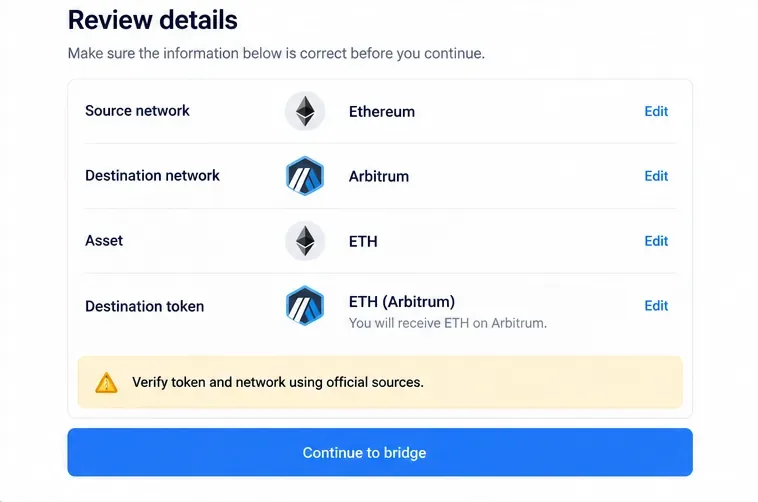
In Maya's ETH-to-Arbitrum example, she verifies that the bridge documentation says the route delivers the form of ETH she expects on Arbitrum. For a stablecoin or governance token, this identity check becomes even more important because multiple representations can exist.
Step 4: Confirm the destination network and exact asset using official sources before proceeding.
5. Review the quote, fees, and expected amount received
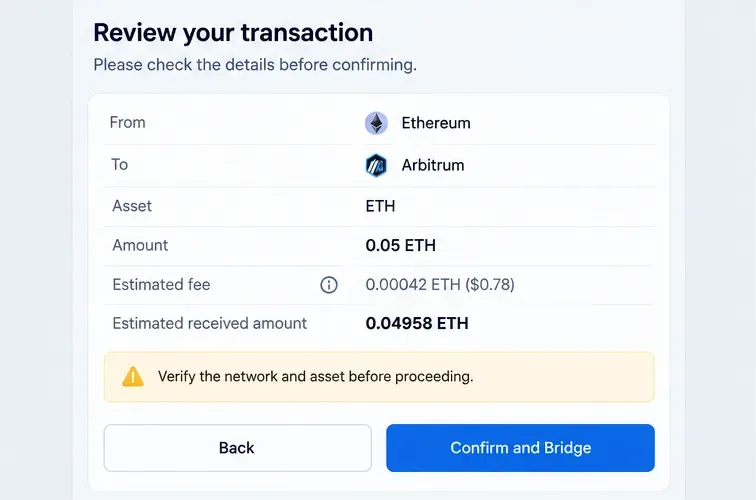
Before signing, Maya reads the quote as if it were an invoice. She checks the amount leaving her wallet, the estimated network fee, any bridge or liquidity fee, and the amount expected to arrive. These values are time-sensitive. Gas prices, liquidity, route selection, and market conditions can change between quote and execution, so a number shown in this example should never be treated as a current price.
Also distinguish network gas from a bridge fee. Gas pays for blockchain execution. A bridge or liquidity provider may charge a separate fee or embed costs in the route. If a cross-chain swap changes the asset as well as the network, price impact or swap fees may be another component.
Step 5: Review every cost and the expected destination amount; use the live quote shown immediately before signing.
6. Read wallet prompts and token approvals carefully
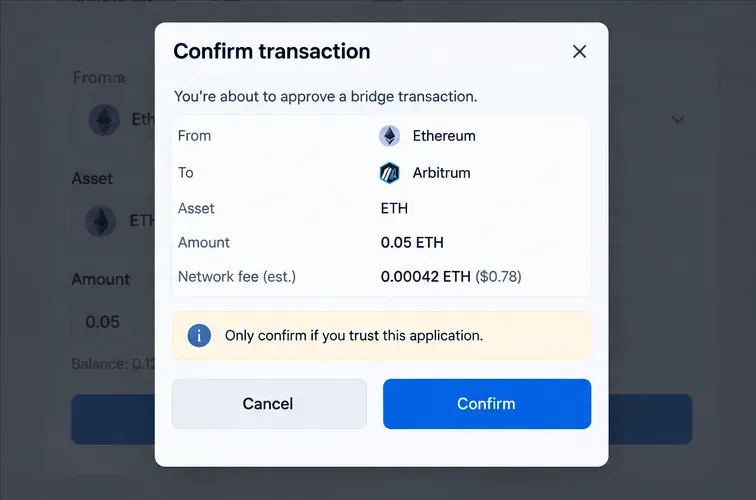
For native ETH, Maya may only need to confirm the bridge transaction. For an ERC-20 token, a bridge commonly needs an approval transaction first, which authorizes a smart contract to spend a specified amount of that token. The approval and the bridge transaction are separate permissions, so Maya checks the contract, token, allowance amount, network, and transaction details before confirming.
Never sign a prompt because a website says “verification” or “sync wallet.” The wallet prompt is the authoritative place to inspect what your account is being asked to authorize. If the contract address or network is unexpected, cancel and verify the official URL again.
Step 6: Read the wallet confirmation carefully and cancel if the network, contract, asset, amount, or requested permission is unexpected.
7. Track the source transaction and bridge status
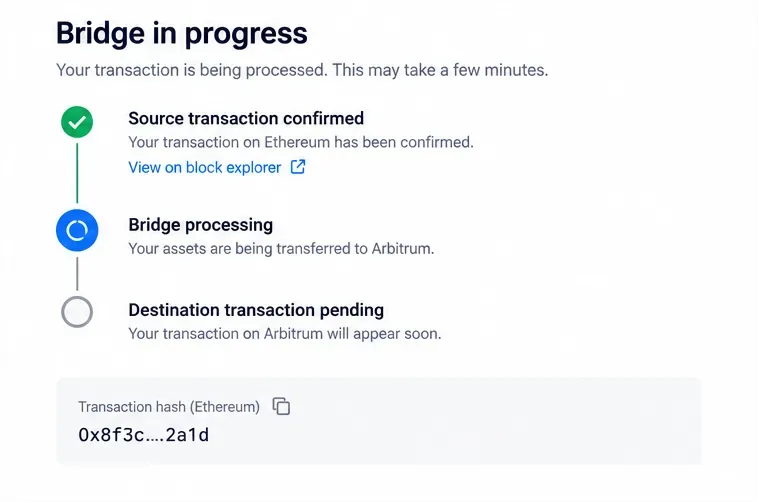
After Maya confirms, she saves the source transaction hash and watches its status on the relevant block explorer or the bridge's official status page. “Source confirmed” does not always mean “destination delivered.” A bridge can have additional verification, relay, settlement, or finalization steps before the destination balance appears.
Do not repeatedly submit the same transfer merely because the destination wallet does not update immediately. First check the source transaction, then the bridge status, then the destination chain. Processing time varies by bridge design, chain direction, congestion, and route, so there is no safe universal time estimate for every bridge.
Step 7: Save the transaction hash and distinguish source-chain confirmation from destination-chain completion.
8. Verify arrival on the destination chain
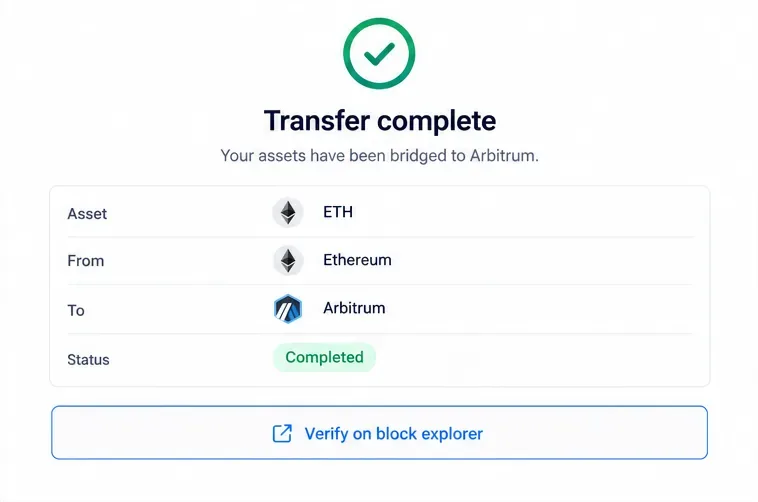
Finally, Maya switches her wallet to Arbitrum and verifies the balance there. If an ERC-20 token does not appear automatically, she checks the official token contract address before importing it into the wallet. The strongest confirmation is not a green banner alone; it is a destination-chain transaction or balance that can be independently verified on the correct block explorer.
Maya also leaves enough ETH on Arbitrum to pay for the next transaction she intends to make. Bridging a token successfully is not useful if the account has no native gas asset to interact with the destination application.
Step 8: Verify the destination balance and transaction on the correct chain before treating the bridge as complete.
Common mistakes that can cost money
Sending normally when a bridge is required
On EVM-compatible networks, a wallet may use the same address format on multiple chains. That does not make the chains interchangeable. A normal transfer stays on the network where it was submitted unless a bridge or cross-chain service performs the cross-chain operation.
Choosing a token by name alone
Token symbols are not unique identifiers. Confirm the destination token contract or the bridge's documented canonical asset, especially when a network has both native and bridged versions of a stablecoin.
Using the entire balance
If you enter “max,” you can leave yourself without enough native gas to execute the source transaction or a later action. Keep a buffer based on the current network estimate.
Assuming a successful source transaction guarantees instant arrival
Cross-chain delivery can involve multiple stages. If the bridge shows a delay, use its official support and transaction-tracking tools. Do not send a second transfer until you understand the state of the first one.
Trusting a bridge only because it looks familiar
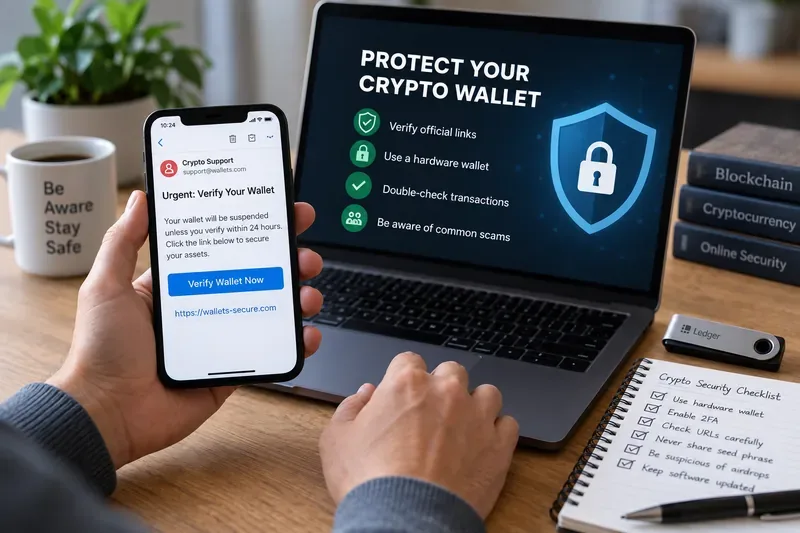
Phishing sites can copy branding and interface patterns. Start from verified documentation, bookmark the official page if you use it repeatedly, and never enter a seed phrase into a bridge website.
How to evaluate bridge risk before a larger transfer
Bridge risk is broader than “has this bridge ever been hacked?” Ethereum's documentation highlights smart-contract risk, systemic financial risk from wrapped assets, counterparty risk in trusted designs, and unresolved behavior under unusual network conditions. A practical review should therefore ask several questions: who verifies cross-chain messages, who can upgrade or pause contracts, how destination assets are backed, what happens if relayers fail, whether liquidity can be exhausted, and which chain provides final settlement.
For an ordinary user, you do not need to audit code to apply these ideas. You can still favor official documentation, understand whether the route is native or third-party, check public audits when the project publishes them, use a smaller initial transfer, and avoid concentrating more value in a bridge than you need for the task.
What happens if a bridge transaction appears stuck?
Check the source transaction hash on the correct source-chain explorer.
Confirm that it succeeded rather than merely being submitted.
Open the official bridge status or transaction page and look for a relay, claim, or finalization step.
Switch the wallet to the destination network and verify the destination transaction or token balance independently.
If the interface requires a manual claim, follow only the bridge's official documentation.
If support is needed, provide the public transaction hash, not your seed phrase or private key. Legitimate support should never need those secrets.
The key idea to remember
Bridging is a cross-chain protocol operation, not an ordinary wallet send. The safest workflow is to identify the exact destination asset, select a route whose trust assumptions you understand, inspect the live quote and wallet prompts, preserve gas on both sides where needed, track the source and destination transactions separately, and verify the final balance on the destination chain.
In the hypothetical Maya example, success is not defined by clicking “Bridge.” It is defined by confirming that the intended 0.05 ETH route was authorized on Ethereum, processed by the chosen bridge, and independently visible on Arbitrum. That same verification mindset applies whether you are bridging ETH, a stablecoin, or another supported token across compatible networks.