Home
» Knowledge
»
How to Use Stop-Loss and Take-Profit Orders Effectively in Crypto Trading
How to Use Stop-Loss and Take-Profit Orders Effectively in Crypto Trading
Stop-loss and take-profit orders are most useful when they turn a trading idea into a predefined exit plan. The goal is not to find a percentage that works for every cryptocurrency. It is to decide, before the trade becomes emotional, where the original idea is no longer valid, where profits would be worth realizing, how much capital is at risk, and what type of order is most likely to behave as intended.
As of September 2026, major exchanges still implement these tools differently. Coinbase Advanced documents attached take-profit/stop-loss and bracket orders, Kraken Pro futures supports TP/SL bracket exits, Binance Spot documents OCO orders that combine a limit order with a stop-limit order, and Bybit's derivatives documentation was updated on September 13, 2026 with its current TP/SL behavior. That means the risk-management principle is portable, but the exact buttons, trigger prices, order types, and cancellation rules are not. Always verify the documentation for the market you are actually trading.
What should a good stop-loss and take-profit plan accomplish?
A good plan should do four things. It should cap the amount you are prepared to lose if the trade thesis fails, define a realistic area for taking profit, use an order type whose fill behavior you understand, and leave you with a result that can be reviewed objectively afterward.
If the stop is so tight that ordinary volatility repeatedly removes you from otherwise valid trades, it is not doing its job well. If the stop is so wide that one loss is disproportionate to your account, position sizing is wrong. If the take-profit is placed at an arbitrary round number with no relationship to market structure or expected reward, it may be more decorative than useful.
Step 1: Set the invalidation point before choosing position size
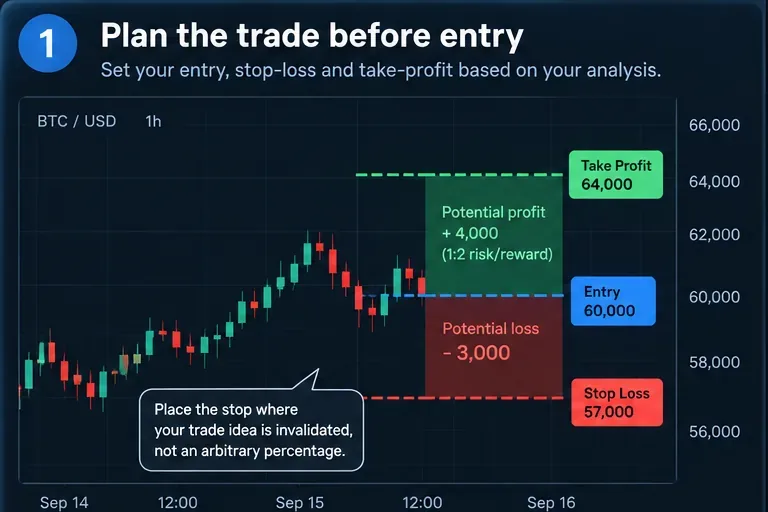
Step 1: define the entry, invalidation point, and profit objective before opening the trade. The chart is a conceptual example, not a screenshot of a specific exchange.
Start with the chart or trade thesis, not with the amount of money you want to buy. For a long trade, ask what price action would tell you that the setup has failed. That might be a break below a support level, a swing low, a range boundary, or another condition defined by your strategy. For a short trade, the invalidation point is typically above the market.
Only after identifying that level should you decide how large the position can be. A simple risk calculation is:
Dollar risk per unit = entry price − stop price for a long position.
If a hypothetical trade enters at $60,000 and the stop is $57,000, the price risk is $3,000 per BTC. If the trader's maximum planned loss for the trade is $150, a full 1 BTC position would obviously be too large. Ignoring fees and slippage for illustration, the position size implied by that $150 risk budget would be 0.05 BTC.
This approach keeps the stop where the trade thesis says it belongs and adjusts the position size around it. The weaker alternative is to buy a fixed amount first and then move the stop closer simply because the potential dollar loss feels uncomfortable.
Do not forget slippage and fees
The calculation above is only a planning estimate. In a fast market, the actual exit may occur beyond the stop trigger. Trading fees also increase the final loss or reduce the final profit. Leave room in the risk budget for both, especially in thin altcoin markets or during major news events.
Step 2: Choose between stop-market and stop-limit behavior carefully
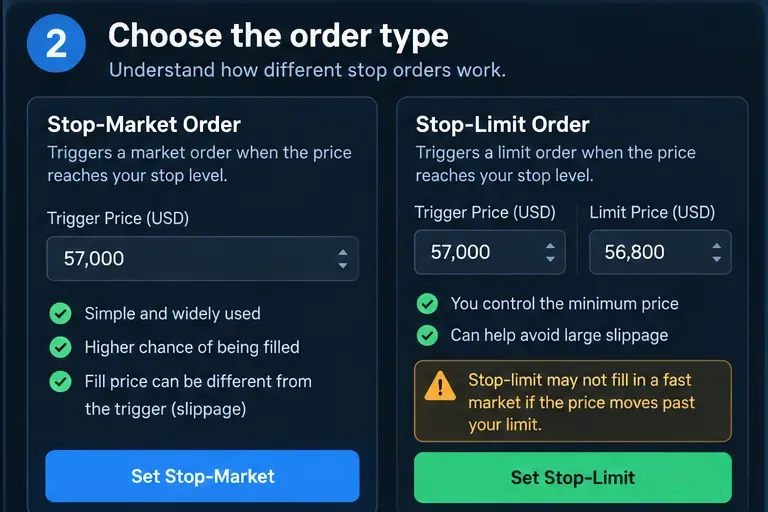
Step 2: choose an exit order whose execution behavior matches the risk. A stop-market prioritizes getting out after the trigger, while a stop-limit adds price control but can remain unfilled in a fast move.
A stop price is a trigger, not a promise that you will receive that exact execution price. What happens after the trigger depends on the order type and the exchange.
A stop-market style exit generally prioritizes execution. Once the trigger condition is met, the resulting order seeks the best available prices. The advantage is a higher likelihood of exiting. The tradeoff is slippage: during a gap or sharp liquidation cascade, the fill can be materially worse than the trigger.
A stop-limit order works differently. When the stop price is reached, the exchange submits a limit order at the specified limit price. This gives more control over the worst acceptable limit price, but it creates a different risk: if the market moves through that limit too quickly, the order may not fill and the position can remain open.
Coinbase's official Advanced Trade order-type documentation explicitly states that stop-limit orders are not guaranteed to fill and that downside protection can fail during extreme volatility. Its international trading rules likewise state that a triggered stop-limit order is not guaranteed to execute. That limitation is fundamental to limit-order mechanics, not a minor technical detail.
When might each type be more appropriate?
Priority
Order behavior to consider
Main limitation
Exit the position once the stop is reached
Stop-market or an exchange's market-style stop
Fill price can be worse than the trigger because of slippage
Avoid selling below a specified limit
Stop-limit
The position may remain open if price moves beyond the limit
Manage both upside and downside exits
Bracket, TP/SL, or OCO if supported
Rules and availability differ by venue and product
There is no universally superior choice. A highly liquid BTC pair during normal conditions is different from a thin token during a sudden market shock. The important question is which failure mode you are prepared to accept: a worse-than-expected fill, or the possibility of no fill.
Step 3: Pair the stop with a take-profit that reflects the trade
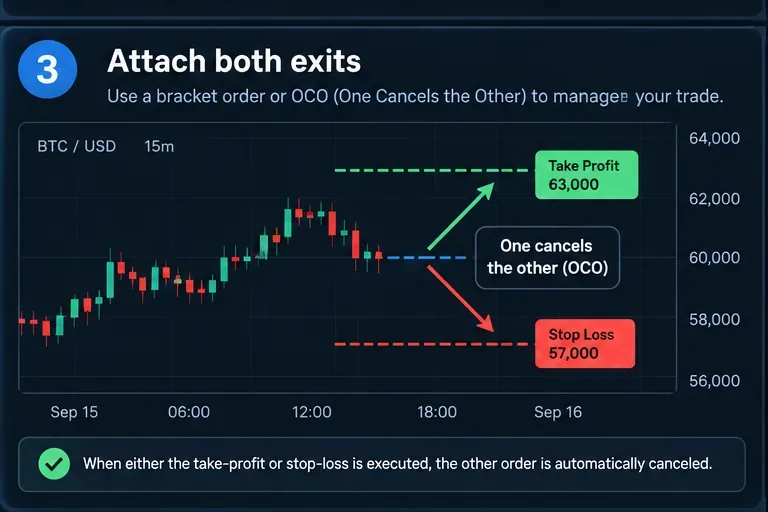
Step 3: where the platform supports bracket or OCO logic, link the profit and loss exits so execution of one cancels the other. Exact availability and trigger rules vary by exchange and market.
A take-profit order should answer a different question from the stop. The stop defines where the idea is wrong. The take-profit defines where enough of the expected move has occurred that realizing gains makes sense under the strategy.
One useful way to evaluate the relationship is the planned reward-to-risk ratio. In the $60,000 entry example, a stop at $57,000 risks $3,000 per BTC. A take-profit at $64,000 offers $4,000 of upside, or about 1.33 units of planned reward for each unit of price risk before fees and slippage.
That ratio is not automatically good or bad. A strategy that wins frequently may function with a smaller average payoff, while a lower-win-rate strategy may require larger winners relative to losses. What matters is whether the relationship is supported by the trader's tested process rather than chosen because “2:1” or another number sounds professional.
Use bracket or OCO logic when it is available and appropriate
Platforms increasingly provide ways to link both exits. Coinbase describes TP/SL and bracket orders in which the triggered side cancels the other. Kraken's official futures bracket-order documentation similarly explains that when both take-profit and stop-loss exits are attached, triggering one cancels the other. Binance's official Spot OCO documentation describes an OCO as a limit order combined with a stop-limit order, with the remaining leg canceled when the other executes under the product's rules.
Linked exits reduce the chance of forgetting to cancel an obsolete order after the position closes. They do not eliminate execution risk. A stop-limit leg can still remain unfilled, partial fills can complicate the remaining quantity, and some platforms activate protective orders only after some or all of the parent order fills.
For derivatives, also check which price triggers the stop. Depending on the venue, the trigger can use last traded price, mark price, index price, or a selectable alternative. Bybit's current perpetual and futures TP/SL documentation is one example of why product-specific rules matter. A trader who assumes every stop watches the same reference price can be surprised during volatile conditions.
Should you take all profit at one target?
Not necessarily. A single take-profit creates a simple, testable rule. Scaling out at multiple targets can reduce exposure as the trade moves favorably, but it also adds more decisions, fees, and record-keeping. Neither approach is automatically better.
If you use multiple targets, decide the percentages before entry. For example, a plan might close part of the position at the first resistance zone and leave the rest for a higher target. Avoid inventing new targets in real time merely because the market moved quickly. Otherwise the take-profit plan stops functioning as a rule and becomes a moving emotional response.
Should you move a stop to break-even?
Only when your strategy provides a reason. Moving a stop to entry can protect against turning an unrealized gain into a full planned loss, but it can also place the stop inside normal market noise and remove you before the larger move develops.
Instead of automatically moving to break-even after a fixed percentage gain, define a condition. Examples might include a confirmed breakout, a new swing structure, or price reaching the first planned target. Then test whether that rule improves results over a meaningful sample of trades.
Step 4: Judge the exit by execution quality, not just profit or loss
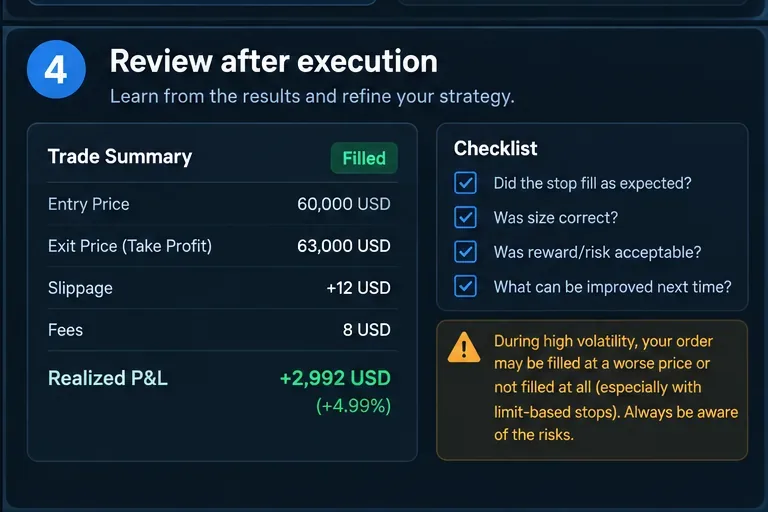
Step 4: review actual execution rather than judging the trade only by whether it made money. Record slippage, fees, fill quality, position size, and whether the original risk plan was followed.
A profitable trade can still be poorly executed, and a losing trade can still be well managed. After the position closes, record what actually happened.
Was the stop located at the planned invalidation level?
Was the position size consistent with the maximum planned loss?
Which reference price triggered the order?
What was the difference between trigger price and average fill price?
Were there partial fills?
How much did fees and funding, if applicable, affect the result?
Did the take-profit or stop cancel its linked order correctly?
Did you manually change the exit because of new information, or because of discomfort?
The strongest sign that a stop-loss process is working is not “I never lose.” Losses are unavoidable in trading. A better sign is that individual losses remain within the planned range most of the time, unexpected execution events are understood, and the rules can be repeated consistently.
When should you change the method?
Change the method when evidence shows a recurring problem, not after one frustrating trade. If stops are repeatedly hit by normal volatility before the original thesis plays out, review whether they are too close or whether the entry timing is poor. If realized losses are consistently much larger than planned, examine slippage, liquidity, order type, leverage, and position size.
If take-profit orders frequently close trades just before much larger moves, that does not automatically mean the targets are wrong. Compare the additional profit you might have captured with the extra reversals you would also have endured. A change should improve the strategy across a series of trades, not merely rewrite the last outcome.
Important limitations of stop-loss orders in crypto
Stops reduce some risks; they do not remove market risk. Crypto trades around the clock, liquidity can thin rapidly, and large price moves can occur without a traditional market close. During extreme volatility, a market-style stop can suffer severe slippage. A stop-limit can fail to fill. An exchange outage, API disruption, liquidation event, or account-level restriction can also prevent the exit from behaving as expected.
For leveraged futures, a stop does not guarantee that liquidation will be avoided if the market moves too quickly or if the stop is placed beyond the liquidation level. The protective order should be planned with the liquidation mechanics and margin rules of the specific contract in mind.
Finally, exchange-held conditional orders depend on the exchange's infrastructure. Traders using self-custody or decentralized protocols may face entirely different automation, oracle, gas, and smart-contract risks.
A practical four-step routine
Define the trade first. Mark the entry, the price that invalidates the setup, and a realistic profit objective.
Size the position from the stop distance. Keep the planned account-level loss within a predetermined risk budget, with room for fees and slippage.
Select and link the exits. Understand whether the stop becomes a market or limit order, what price triggers it, and whether OCO or bracket logic is available.
Review the actual fill. Compare trigger, fill, fees, slippage and behavior against the original plan, then change rules only when a repeated pattern justifies it.
Bottom line
Effective stop-loss and take-profit use is less about finding perfect percentages and more about building a repeatable decision process. The stop should represent invalidation, the position size should make that loss tolerable, the take-profit should match the strategy's expected payoff, and the order type should reflect how much you value execution certainty versus price control.
The final test is measurable: did the trade behave within the risk you intended, and can you explain any difference between the plan and the actual execution? If you can answer that consistently, stop-loss and take-profit orders are functioning as risk-management tools rather than just buttons on a trading screen.